
Welcome back Treat or Trickers!
Thank you for all the lovely comments and Halloween links!
I thought it would be nice to have a little something everyone could share, so I have some instructions for a Halloween decoration I stitched up over the weekend.

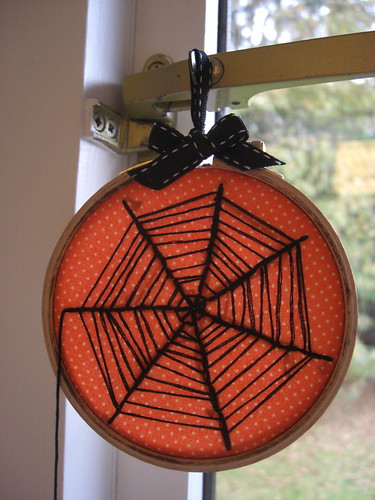
Dangly Spider Stitch Picture
Being the silly girl I sometimes am, I forgot to take photos during the making! So I settle down with a large cup of fruit tea and scribbled the instructions instead...
The "Bits and Bobs** of Spiders and Stitches"
I stitched this up in the time it took to watch a movie, so quite a quick little thing to do
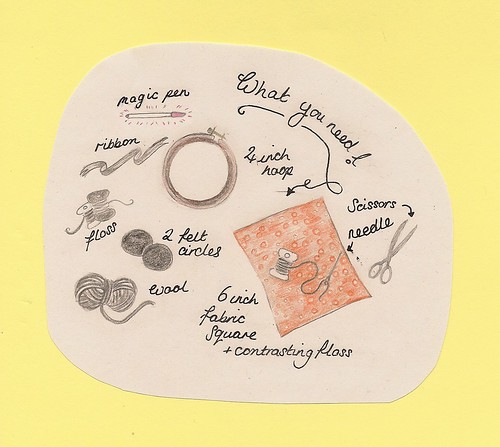
* a needle *
* 4 inch embroidery hoop *
* Roughly 6 inches of lovely fabric *
* Floss that stands out on said lovely fabric *
* 2 small black felt circle *
* Some black and white floss *
* Black wool *
* Scissors *
* a little bit of ribbon *
* magic pen *
**
Part 1 or "Jump in the hoop and big fat stitches"
Put your lovely fabric in the hoop nice and tight. Find the centre and from there, draw 7 cobweb 'legs' with your pen.

With a nice fat piece of contrsting floss, stitch all the 'legs' with a back stitch. I used the whole 6 strands for this bit. You now have 7 big chunky legs (and I mean that in the nicest possible way!)
**
Part 2 or "Spinning a web and cutting it free"
To 'spin' the web, use a thinner piece of floss (I use three strands). Starting near the centre, stitch across from one leg to the next with big, long stitches. A bit of random wonkiness looks best I think, but don't cross the threads! You can see a close up of my web here to see what I'm trying to say. Keep stitching like this until your web is full and you think it will make a nice home for a spider.

The quickest way to neaten the pictures edges is to make sure the fabric is stretched tight over the hoop and the hoop is fastened as tight as possible, then just trim off the extra fabric. For a more secure fastening, leave a little extra fabric and glue this extra to the back of inner hoop. I didn't glue mine this time, but I have zigzag machine stitched the edge to stop fraying.
**
Part 3 or "The little spider friend"
Take the wool and wrap it around your hand twice, making two big loops. Then tie the ends in the middle tightly making four loops as shown. Cut the loops open and you have 8 wooly legs tied together.
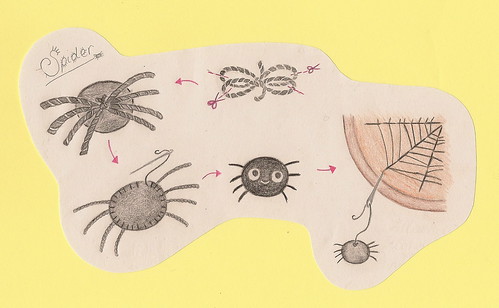
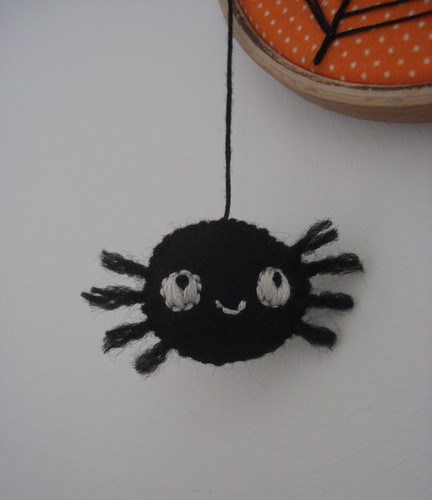
Put the knot in the centre of an felt circle and sandwich it with the other circle. Spread the legs as you like around the edge and stitch the black circles together with the black floss. If you like chubby spiders, you can stuff him with a little spare wool before closing up the body. Give the little guy some eyes with the white floss. Smile at what a cute little spider you made :)
Attach your spider friend to his web with a length of thick web-coloured floss.
Tie a ribbon around the hoop's fastening to make it spooky pretty, hang it on the wall and...

Tada! A Dangly spider stitch picture of your own!
I hope you will get a treat from my first little tutorial.
And last but not least
My little spider friend and I can tell you that the super fun random name fruit machine picked...
Patty
as the winner of the Halloween goodies!
I am so excited to be sending Patty my blog giveaway parcel as she has been a brilliant friend to me and is an angel of the crafting world by sharing millions (its a guess but probably not far off!) of crafty links to free patterns and more. She left me the 'treat' of this link to this witchy blog filled with happy pink halloween-ness!
You can find Patty at her wonderful Pipstitch blog
Thanks again for stopping by!
Happy halfway to Halloween
xo
Definitely the cutest thing I have seen all week!!! Thanks for the instructions, this is ingenious and adorable ♥♥♥
ReplyDeletehahah thats so cute!!!
ReplyDeleteyour instructions are too cute!!! :) love the spidy! :)
ReplyDeleteso cute! i love the drawings!
ReplyDeleteSuch a great idea! Thank you for the how to! <3
ReplyDeleteCompletely adorable! Such a clever idea, and I love your web especially.
ReplyDeletethis is TOO cute! jessica
ReplyDeleteThis is so cute, Jenny! And, thank you for picking me to win your giveaway! Your pins are the cutest things ever!
ReplyDeleteseriously adorable!! I might try to whip one up later
ReplyDeleteI love the project--what a fantastic idea! I think the hand drawn tutorial is far more charming than a photographed tutorial would have been.
ReplyDeleteThis is darling! I love that you drew the tute! I'll be linking!
ReplyDeleteThis is just so cute, and I love your illustrations. I linked to you! :)
ReplyDeletehttp://manhattancraftroom.blogspot.com/
Oh, this is cute!
ReplyDeleteAbsolutely adorable!
ReplyDelete-myra
www.mylittlemochi.typepad.com
That is so cute! :)
ReplyDeleteThank you for the tutorial!
cool
ReplyDeleteThe blog was absolutely fantastic! Lots of great information and inspiration, we got it which we all need! thanks a lot I would like to take a look at our site providing great discount coupons that we are having:
ReplyDeletehttp://www.greatcoupons-online.com/
thanks,
coupons
cheap wedding invitations
ReplyDeletewedding invitations
green wedding invitations